

How to start a new WordPress blog in 2024? How much time would it take to launch a WordPress blog? The questions mentioned above make you anxious as a beginner. So presuming that neither you are a computer nerd nor able to code. Any guess? Ok, the answer is not more than 13 minutes. The current WordPress dashboard capabilities and advanced WordPress plugins almost automated the process of starting a WordPress blog. So be with me till the end & you will have your own wonderful blog.
There are many popular services like BlogSpot, Medium, and Tumblr. They are offering the writers to create content on their platforms without spending a single penny. However, having a personal blog website is the most popular & preferred way to be a professional blogger.
With my experience, I can conclude that people usually start a WordPress blog due to two reasons. First, the passion for sharing what they know. Second, they want to earn money from that blog. Whatever reason you have for owning a personal blog website, your success always depends on quality content and your patience.
Does Every Niche Require a Different Way to Start a New Blog?
Why do I am answering this specific question? Because everyday new bloggers ask questions like-
- How to start a food blog?
- How to create a blog on digitalization can save the environment?
- How to create a fashion blog?
- How to create a tech blog?
Well, my answer to all those queries is, that you can choose a niche of your choice, but the process of creating a blog for all niches is the same.
I mean, every new blogger has to follow the basics. These basics and step-by-step guides for creating a WordPress blog will always be the same. Let’s start the journey now.
Four Must-Need Things to Start a New WordPress Blog in 2024
- Blogging Platforms like WordPress and Joomla [similar to our skeleton].
- A Domain Name like blogstudies.com [Name of your blog] as we have our own name.
- A web Hosting Account [similar to our soul].
- A theme for your new blog [similar to clothes that decide how we will look].
let’s begin the journey of your own blog step by step-
Is it tough to choose what you want to share? Oh, you are still confused about your skillset and passion. For that, I would recommend you to do one simple exercise-
- Write down what you love to do.
- What do you possess as your best skills that you can write?
- How you can be helpful in solving a reader’s problem with your skills?
Choose the best out of written things that give you the best push to write a blog. In case you are influenced by a blog or person you can make huge money through blogging in a very short period, and this is the only reason you want to start a blog. Believe me, you are on the wrong path.
My suggestion to every blog aspirant is to go for blogging if you have a passion for it. I assure you money will follow your passion.
It is practically proven that focused blogs [Niche] are more successful than multi-topic blogs. Personally, I recommend a focused blog because it gives you more loyal readers.
We hope now you have a clear idea about your subject matter. Let’s move on to the second step.
Step-2. Selecting The Blogging Platform
Here with 200% surety blogger community’s first choice is WordPress.
According to W3Techs, WordPress powers 35% of all the websites on the internet. Below mentioned data will make you obstinate to choose WordPress over other platforms.

Here WordPress means we are talking about wordpress.org, the self-hosted blogging platform. Don’t be Confused. While you are growing older with your blog, you will come to know about two different WordPress- the first one is wordpress.org, and another one is wordpress.com [We will not dig deeper].
Step-3. Select WordPress Hosting and Domain Name
3rd Step is the most critical step. The performance of your blog mostly depends on the hosting provider you are going to opt for.
As a beginner, you must be looking for a lucrative deal to buy a domain name and hosting services. In general, a domain name costs somewhere $15-16 for one year, and hosting services $8 – 12.
For our readers, Bluehost is providing a free domain name while opting for their hosting services at just $2.65 per month [now this is a lucrative deal].
Note:- Bluehost’s hosting deal keeps rotating between $2.65 and $3.95 throughout the year. You will get the best deal of that time when you opt for Bluehost.
So let’s decide your domain name first-
My name is Sandeep, and that’s my identity. Similarly, www.blogstudies.com [name of blog] is the identity of this blog website. I hope you are getting the concept of the domain name. Here I am mentioning some features and pro tips to choose the most suitable domain name for your blog.
Features of the Best Domain Name
- Try to use keywords related to the category of your blog. Like blogstudies.com is based on blogging tutorials and guidance.
- Keep it short as much as you can.
- A domain name should be easy to type, pronounce, and remember [What do you think about blogstudies.com?].
- Use the .com extension as it is best for search ranking and optimization.
- Don’t use hyphens and numbers in the domain name as they are signs of spam websites.
I hope the concept of choosing a domain name is very clear to you. Before we proceed further, I would advise you to keep 5-6 domain names ready as some of your chosen domain names may have been booked by someone else.
Why Bluehost?
I have mentioned earlier that Bluehost provides a free domain while you buy their hosting services. Also, Bluehost is highly recommended by WordPress. On top of that, their five-star rated services are highly appreciated.
Bluehost provides a free SSL certificate at no extra cost that plays a critical role in the website’s security, reliability, and search ranking of the website.
Now let’s learn how to buy Bluehost hosting with a free domain name Step by step –
3A. Head Over to the Bluehost Home Page
Hit Here you will be redirected to the Bluehost home page.

Now click on the green-colored Get Started Button.
3B. Choose a Hosting Plan
On the next page choose the hosting plan-

Tip:- Choose a basic plan initially while you are just beginning. Later on, when traffic goes up, you can upgrade to a higher plan at any time. Both basic and plus plans are very favorite among WordPress beginners [Check your requirement before you choose one between basic and plus. Now hit the select button and move forward to the next page.
3C. Domain Name Creation
Here we have three options-

- Create a New Domain Name – If you don’t have a domain name, then first you need to create a new domain by opting for this option. Now fill in your desired domain name and hit next. When you are creating a new domain name, don’t forget to opt for domain privacy and protection.
- Use a Prebooked Domain Name – if you own a pre-booked domain name, then fill it up here and hit next.
- I’ll Create My Domain Later – If you want to finish your SignUp process first, in that case, you can skip this step, but we don’t recommend this as it is better to create your domain name right now for a smooth process.
Now you are ready with your domain name so hit the next button.
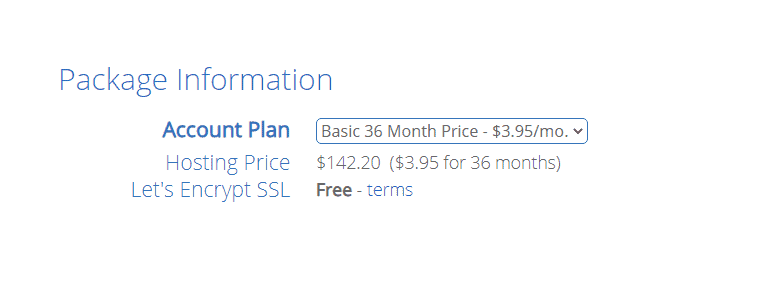
3D. Final Signup for Bluehost Hosting Account
Fill out your details at the top of the page.

In the middle of the page select the duration of the package. My recommendation is to go with the package of 36 months because renewal prices are very high. Also, the best discount is applicable only to the 36-month package. Along with the package, you will get an SSL certificate without any additional cost.
After package selection, you will find some more add-on options. These add-ons are not required that much. Also, you can buy them in the future if needed. You can opt for domain privacy and protection [If Provided as an option] as I mentioned earlier in the ‘creating a new domain’ step.

Now buy the package with your preferred payment mode. Check-in for the terms and conditions statement and submit the payment details.

In a few moments, you will get an email with SignUp information to the Cpanel, where you are going to install WordPress.
Step-4. WordPress Installation on Bluehost

This is an automated step that means after the signup process, Bluehost installs WordPress automatically to make it easy for beginners. Next, you need to log in to the Bluehost account.
On the Bluehost dashboard, you can see a button for login to your WordPress account. You can bookmark the WordPress login link for a swift login in the future.
Step-5. Essential WordPress Modifications After Installation
In this step, you need to change some basic settings. It is time-consuming and irritating to change general settings frequently. That’s why we are changing the default settings to the required settings.
5A. Delete The Default Content
On your WordPress dashboard at the extreme top left, you will find posts, pages, and comments section. Delete all the default posts, pages, and comments before you start writing your first blog.
5B. General Setting Modification
Click on Setting > General > scroll down for Timezone [This is an important modification].

Hit on Timezone and select your country’s Timezone. Below the Timezone, you can change the date and time format at your convenience.
Apart from the Timezone, you can edit the site title, tagline, and admin email address under general settings at the top of the page.
Don’t change anything to “membership and new user default role” as of now because it’s useful for multi-author blogs.
5C. Media Settings
Settings > Media

Put zero in all the options as shown in the image and click on save changes. This will stop WordPress from creating multiple sizes of an uploaded image. Multiple images can slow down the blog website.
5D. Permalink Settings
Settings > Permalinks
Here you need to check off the default “plain” permalink settings in WordPress [https://blogstudies.com/?p=123] and set it to “post name” [https://blogstudies.com/sample-post/] and save changes.

This setting will display the address of your post link in the address bar of the browser.

Step-6. Select a Smart Theme for Your Smart Blog
I have used the smart word two times, guess why? Because almost all theme developers are providing SEO-ready themes. An SEO-ready theme means a lot as every WordPress blogger wishes to have an SEO-optimized super blog.
The theme is similar to our clothes. It will provide your website a visual appearance.
Let’s check below the default look of your brand new blog-

Don’t you think your blog deserves a better look than this?
So you can select a theme in two ways-
6A. Select a Theme from the WordPress Dashboard
Click on Appearance > Theme and now click on the Add New button.

On the next screen, you will find several WordPress themes. This collection of WordPress themes is known as the WordPress theme directory. Here you can sort, filter, and select any smart and classy theme of your choice.

While moving the mouse cursor over themes will show you two buttons Install and Preview.

You can take a tour of your selected theme by clicking on the preview button. Once you are satisfied with the selected theme, go ahead, and hit the install button.
One thing you should keep in mind is that the preview of your selected theme won’t be identical to the given screenshot as you need to customize different elements like photographs, typography, color scheme, and design as per your liking.
After installation, you will see the “Activate” button instead of the “Install” button. Now click on the “Activate” button, and your theme will be activated immediately.

Later on, you can edit or customize your theme by using the customized options of the appearance menu.
6B. Select a WordPress Theme from Third Party Websites
Just in case you have the budget and looking for a WordPress theme with pro features, you should consider third-party WordPress theme developer websites. The fact of the matter is that a pro theme comes with must-have inbuilt features like responsive design, easy to customize, SEO readiness, and tech support. If you are out of budget, no worries, you can buy it later.
Some recommended third-party theme websites-
- Studiopress.
- My Theme Shop.
- Theme forest.
Step-7. Include Must Have Plugins for Your Brand New WordPress Blog
Before we move ahead, let’s understand the keyword “Plugin”.
Basically, Plugins are easy-to-use applications that enable you to do a technical task without writing a single code. In other words, plugins will provide you amazing add-on features to your blog. You just need to install and activate them as you installed your blog theme, the rest they will do on their own.
Now your blog is almost ready, but before starting your first blog we need to add some more effective plugins to speed up the success. Initially, you must have plugins for the tasks mentioned below-
7A. A Plugin for Creating an Email Subscription List
Building your subscription list from day one would be a great strategy because your readers are the only key factor to the success of your blog.

“Bigger subscription list ensures the bigger success of blogging career”.
There are many advantages to email marketing services like Mailchimp and Sendinblue [both provide a free plan for beginners and small businesses]. You can manage your subscription list, email marketing campaigns, and many more of these tools. Your theme provider provides you a default email newsletter subscription widget by default. You just need to integrate email marketing service to start engaging your readers.
7B. A Plugin to Optimize WordPress Blog for SEO
For a WordPress beginner, it is difficult to write SEO-optimized blogs. SEO-optimized content makes a blog search engine friendly.

Many small key factors play significant roles like how you should write your blog title, what heading type you should use, what frequency of keywords you should use, and many more.
The answer to the above questions is the Rank Math SEO optimization plugin for WordPress. Although the Yoast plugin is equally good. The Yoast SEO plugin’s pro features come with a price, while Rank Math is providing premium features at no cost.
Being a free and user-friendly SEO plugin, my vote goes for Rank Math. Now Rank Math Pro is available with great features like multiple schema compatibility with a single WordPress website.
7C. A Plugin to Setup Google Analytics on WordPress Blog
Data is being considered the power of every business, strategy, and future plan in the 21st century. You need to act upon the same to be a successful blogger.

Google Analytics is the best tool for analyzing visitor data. It helps you to analyze-
- How much time every visitor is spending on your blog?
- What is the bounce rate?
- Which country your visitors are coming from?
- Which page of your blog is being surfed most of the time?
This data will allow you to make a better strategy. Isn’t it??
It is techy to apply small scripts into a WordPress blog to configure Google Analytics, especially for a beginner. You need not worry about it, MonsterInsights is here to help you out.
How to set Google Analytics Step by Step with MonsterInsights
Step-1. Sign up for Google Analytics with your Gmail account.

Step-2. Further, you need to provide your website information so fill it up. Google Analytics will generate a tracking code. Keep this screen on.
Step-3. Now open your WordPress dashboard > Plugins > add new > search for MonsterInsights. Now install and activate MonsterInsights. [MonsterInsights is trusted by more than 2 million websites]

Step-4. Click on Insights in the left menu bar > settings > hit on the Connect MonsterInsights button to configure Google Analytics on your website. Now follow the instructions and you will be asked for the tracking code which was generated in the first step. That’s it, now you are enabled to see your website analytics under the Insights tab.

Simultaneously you can visit your Google Analytics dashboard and analyze data there also. [Keep learning about the Google Analytics tool as it’s one of the key tools to improve the quality of your blog].
7D. A Security Plugin to Secure Your WordPress Blog
I don’t want to ruin my hard work by letting it open to be caught by spammers and other unsecured factors. I have Sucuri to secure blogstudies.com. I recommend the same for your brand-new blog.

For beginners, a free version is also available that provides enough features to secure your blog like-
- File Integrity Monitoring.
- Security Auditing.
- Malware Scanning.
- Security Breach Notifications.
- Blacklist Monitoring.
- Security Hardening.
- Post-Hack Security Checks.
- Website Firewall (premium).
7E. A Plugin to Increase the Speed of WordPress Blog
Good website speed is a desired attribute for any blog. You may lose traffic due to a slow website.

The WP Super Cache plugin is our recommended plugin to boost the performance of a beginner blog. You can consider WP Rocket [paid] with premium features if you have a budget.
7F. A Plugin to Backup Your Blog
What if some random error destroys your blog work? A regular backup saves you from this kind of undesired situation.
Trusted by over 3 million websites, UpdraftPlus is a great plugin to back up your blog website. The free version of UpdraftPlus is sufficient when you just start a WordPress blog.
Pro Tip:- You are starting your blog with basic resources as a beginner. We suggest you not overload your blog with multiple bad-quality plugins. They may slow down your blog.
You can install plugins as many as you want but quality plugins only.
Step-8. How to Write Your First Blog Post
To start your first blog, move to the left menu bar of your WordPress dashboard and click on Posts > Add New. A new post-writer/editor page will be opened.
Now you are ready to write your first blog post. Are you ready with the title of the first blog? If yes, start creating content further. Once you finish your blog, you can publish it right away.
If you are using Rank Math or Yoast, then you can see their live guidance to optimize your article on the right-hand side of the post-writer page. Their in-built SEO tips are very helpful for WordPress beginners.
Have you seen two options categories and tags in the post section? They are great inbuilt tools to arrange your content in the best manner. Both tools are very helpful in getting your content found on search engines easily by the most relevant readers.
Pro Tip:- Don’t Publish the article until you finish it [keep saving it as a draft] and don’t overload the post with keywords as it won’t look natural.
Step-9. How to Earn Money from a New Blog
“There are two defined goals of creating any professional blog”.
- First is a passion for writing and sharing.
- The second is to earn money through your passion.
When you start a blog, you will come across many lucrative offers and articles to earn money online in a very short time. Well, our suggestion is to avoid such alluring offers.

The key factor to achieve the above-mentioned goals is the rigorous work with patience.
Now coming back to the point, you must be thinking about how to monetize your blog? Well, your passion will let you monetize your blog in multiple ways.
1. Affiliate Marketing
Affiliate marketing generates the most out of the blog earnings despite being the second most popular art of earning from blogging after Google AdSense.
In this way, you get a commission when your readers buy your recommended product or services that you have experienced or used already.

There are many WordPress tools and plugins available that you can promote through your blog and earn a handsome affiliate income.
Pro Tip:- Promote only experience-based quality products and services. Use products and do a little research before you recommend them to your readers because you and your readers are connected by a bond of great trust. This bond shouldn’t be broken at any cost.
2. Google AdSense
Google AdSense is the best available source of income for displaying automated ads on your blog. Basically, AdSense is based on a PPC (pay-per-click) framework. So more quality traffic will let you earn more through Google AdSense.

Here AdSense is a mediator between you and the ad publisher. AdSense charges from the publisher for providing clicks and traffic through your blog. In return, AdSense pays you some amount for every click provided by your blog.
3. Get Paid for Sponsored Content and Displaying Ads
Once you start getting quality traffic on your blog, you will get contracts from some companies or individuals to write sponsored content. You will get paid by promoting their product or services in your content.
You can also add more profits by displaying ads on your blog. This is very similar to space selling.
4. By Creating an Online Store
Love writing; you may create an online store for selling eBooks on your blog. Similarly, many bloggers are selling other tangible and intangible products or services through an online store. The most popular plugin to create an online store is WooCommerce.
Some other popular earning strategies through blogging –
- By creating a food blog and sharing recipes.
- By creating a fashion blog.
- By creating a tech blog.
- You can create a travel blog.
- By creating a dedicated review blog.
- You can offer paid content by creating a membership site.
Step-10 Keep Upgrading, learning, researching, Innovating and Rectify Mistakes
When you start blogging initially, you seem to be fully loaded with enthusiasm. Since blogging takes a bit of time to give fruitful outcomes, you need to have long-lasting patience with dedication to developing a great blog.
WordPress is an ocean. Keep learning new things, and share them with your readers. Sooner or later [Depends on your intensity of efforts], your passion for blogging, and true work for your readers is going to let you taste sweet success.
I hope you loved the article. Be with me on Twitter and Facebook for something new and valuable for WordPress knowledge.
Keep Doing Inspiring Work.
Suggested Reading:- 15 Essential and Best WordPress Plugins for Your Blog